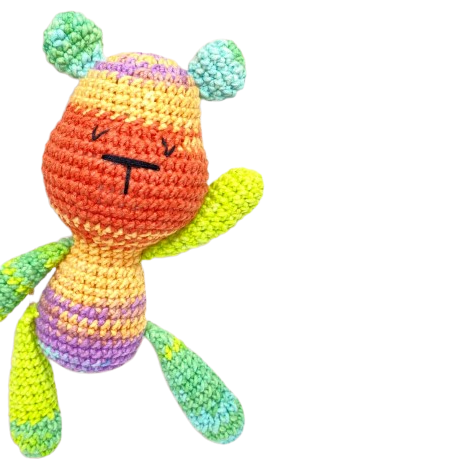
Mooshka dolls can be made in any yarn of your choice with matching hook to go with
it. Finished doll size when worked with DK (medium weight yarn) with 2,5 mm hook (as dolls you can see on the photo) are 26cm tall (10.24 in). They are very look alike rag doll as their body is flat.
Materials needed;
Yarns of your choice for body, hair and dress
The rest of the doll (legs and dress) can be made with leftover yarns to make
Mooshka as colorful as possible.
Matching hook
Stuffing
Ribbons, buttons, beads….anything you can imagine or like to decorate Mooshka’s
dress, head, shoes.
Emboidery thread to crochet the eyes or textile paint if you would rather paint them.
If you prefer safety eyes, find one that will fit the size 5×5 stitches of your gauge
(what will depend of yarn and hook you will use. Make small piece 10 sts x10 rows
and find the adequate eyes based on that. Important is that eyes do not exceed 5×5
stitches).
Embroidery thread or pain for eye brows, lips.
Embroidery needle
Abbreviations:
Ch – chain
St(s) – stitch(es)
Sl st – slip stitch
Sc – single crochet
Inc – increasing stitch (two sc in one stitch)
Dec – decreasing stitch (two sts stitched together, I used invisible decrease)
** – repeat what mentioned in between (followed by x number of repeats)
R – round

Head;
I didn’t write it in the pattern but head is done in finishing rounds. Start each round
with ch1, and finish it with slip stitch.
With yarn in flash color of your choice
Ch6
R1 sc4, 3sc in one st, work around chain, sc3, 2sc in one st (12 sts)
R2 inc1, sc3, inc3, sc3, inc2 (18 sts)
R3 Inc1, sc4, inc1, sc1, inc1, sc1, inc1, sc4, inc1, sc1, inc1, sc1 (24 sts)
R4 sc1, inc1, sc5, inc1, sc2, inc1, sc2, inc1, sc5, inc1, sc2, inc1, sc1 (30 sts)
R5 sc2, inc1, sc6, inc1, sc3, inc1, sc3, inc1, sc6, inc1, sc3, inc1, sc1 (36 sts)
R6 sc3, inc1, sc7, inc1, sc4, inc1, sc4, inc1, sc7, inc1, sc4, inc1, sc1 (42 sts)
R7 sc4, inc1, sc8, inc1, sc5, inc1, sc5, inc1, sc8, inc1, sc5, inc1, sc1 (48 sts)
R8 sc5, inc1, sc9, inc1, sc6, inc1, sc6, inc1, sc9, inc1, sc6, inc1, sc1 (54 sts)
R9 sc6, inc1, sc10, inc1, sc7, inc1, sc7, inc1, sc10, inc1, sc7 inc1 sc1 (60 sts)
R10-R19 sc60
R20 sc6, dec1, sc10, dec1, sc7, dec1, sc7, dec1, sc109, dec1, sc7, dec1, sc1, (54 sts)
R21 sc5, dec1, sc9, dec1, sc6, dec1, sc6, dec1, sc9, dec1, sc6, dec1, sc1 (48 sts)
R22 sc4, dec1, sc8, dec1, sc5, dec1, sc5, dec1, sc8, dec1, sc5, dec1, sc1 (42 sts)
R23 sc3, dec1, sc7, dec1, sc4, dec1, sc4, dec1, sc7, dec1, sc4, dec1, sc1 (36 sts)
R24 sc2, dec1, sc6, dec1, sc3, dec1, sc3, dec1, sc6, dec1, sc3, dec1, sc1 (30 sts)
R25 sc1, dec1, sc5, dec1, sc2, dec1, sc2 dec1, sc5, dec1, sc2, dec1, sc1 (24 sts)
R26 dec1, sc4, dec1, sc1, dec1, sc1, dec1, sc4, dec1, sc1, dec1 sc1 (18 sts)
Stuff the head nice and firm.
Do not cut or tie off…continue working the neck
Neck area
R1 sc18
R2 Inc1, sc4, inc1, sc1, inc1, sc1, inc1, sc4, inc1, sc1, inc1, sc1 (24 sts)
R3 sc1, inc1, sc5, inc1, sc2, inc1, sc2, inc1, sc5, inc1, sc2, inc1, sc1 (30 sts)
R4 sc2, inc1, sc6, inc1, sc3, inc1, sc3, inc1, sc6, inc1, sc3, inc1, sc1 (36 sts)
R5 sc3, inc1, sc7, inc1, sc4, inc1, sc4, inc1, sc7, inc1, sc4, inc1, sc1 (42 sts)
R6 sc4, inc1, sc8, inc1, sc5, inc1, sc5, inc1, sc8, inc1, sc5, inc1, sc1 (48 sts)
R7 sc5, inc1, sc9, inc1, sc6, inc1, sc6, inc1, sc9, inc1, sc6, inc1, sc1 (54 sts)
R8 sc6, inc1, sc10, inc1, sc7, inc1, sc7, inc1, sc10, inc1, sc7 inc1 sc1 (60 sts)
R9-R10 Sc60 x2
Forming arms;
Sl st. last to first chain made, ch1 (this is our last round with sl.st, ch1 work, from now
on continue in continuous rounds)
R1 Sc next5, count backwards 15 stitches and stitch across. We will make arm here
and continue working in continuous rounds with 15 sts (when encounter sl st, ch1,
skip both stitches and continue in next sc making 15 sc round count
R2-R21 Sc15
Somewhere at rounds 19-21 you can change color in order to create bracelet (it is
optional)
R22 Two cluster sts with 3dc in the next two sc , sc13 (15 sts)
R23 dec1, sc1 x5 (10 sts)
R24 Sc10
R25 Dec 5 (5 sts)
Tie off and sew the last row closing it nicely. Hide the thread inside arm area.
Next arm:
Count 15 sts around the opposite end, slip stitch two opposite stitches and continue
stitching 15 in rounds same as with first arm
Repeat R2-R25 above (arm forming)
Note! When reaching R22 of this, second arm making. Pay attention to where the
cluster stitch will be. It should face the inner arm side.
I didn’t have problems with any of the arms and this finger making, as I started to
create arm under arm area. This way, to make thumb was on both hands first stitches
to start with on R22.
Body
Even though there are 30 sts left for the body to continue with, we will stitch corner
stitches as well (to close the gaps under arms) and make 34 sts round.
Start body making the first stitch under arm stitch (this you will achieve by stitching
front and back corners stitches first. Saying this, as it will make the body look nicer,
when we start decreasing and increasing two stitches on each side to shape the doll’s
body;
R1 slip stitch to one of the corner stitches, to start with and sc 34 sts around body part,
stitching 4 of the corner stitches as well (34 sts)
R2 Sc34
R3 Dec1, sc15, dec1, sc15 (32 sts)
(if your first dec is not under arm and you lost this count, adjust the first stitch of this
round to fit the pattern)
R4 Dec1, sc14, dec1, sc14 (30 sts)
R5 Inc1, sc14, inc1, sc14 (32 sts)
R6 Inc1, sc15, inc1, sc15 (34 sts)
R7 Inc1, sc16, inc1, sc16 (36 sts)
R8 Inc1, sc17, inc1, sc17 (38 sts)
R9 Inc1, sc18, inc1, sc18 (40 sts)
Change color for panties
R10 Inc1, sc19, inc1, sc19 (42 sts)

R11-R16 Sc42
R17 Dec1, sc5 x6 (36 sts)
Stuff the body nice and firm. We will add more and finish stuffing before closing last
round. Tie off leaving long end for sewing the body and legs.
First we will sew the body.
Flatten the body (if few stitches are needed to reach the end⁄corner stitch when body is
flattened and ready to sew, sc those few stitches)
Using embroidery needle, sew the last round with whip stitch using just front loops to
(this will close the round nice and give it even closure).
Before sewing it completely, add more stuffing if needed.
Legs x2;
Ch6
R1 Sc4, 2sc in one stitch, work around chain, sc3, 2sc in one st (12 sts)
R2 Inc1, sc3, inc3, sc3, inc2 (18 sts)
R3 Inc1, sc4, inc1, sc1, inc1, sc1, inc1, sc4, inc1, sc1, inc1, sc1 (24 sts)
R4-R5 Sc24
R6 Sc8, dec3, sc10 (21 sts)
Change color (shoe is done)
R7 Sc6, dec3, sc9 (18 sts)
R8-R32 Sc18
Stuff legs nice and firm
Flatten the leg opening on the top making sure when flattened fingers and heal are
pointing right directions and leg is not flattened sideways.
Sc8 stitches stitching through both sides of the top leg piece, closing the leg this way
and making it ready to be attached to the body.
Tie off leaving long end for hiding it in the leg or doll’s body later.
Hair;
Color of your choice
Hair is done in rows. After each row ch1 and turn
Sc5 in magic ring
R1 inc5 (10 sts)
R2 inc1, sc1 x5 (15 sts)
R3 inc1, sc2 x5 (20 sts)
R4 inc1, sc3 x5 (25 sts)
R5 inc1, sc4 x5 (30 sts)
R6 inc1, sc5 x5 (35 sts)
R7 inc1, sc6 x5 (40 sts)
R8-R17 Sc40
R18 dec1, sc36 dec1 (38 sts)
R19 dec1, sc34, dec1 (36 sts)
R20 dec1, sc32, dec1, (34 sts)
R21 dec1, sc30, dec1, (32 sts)
R22 dec1, sc28, dec1 (30 sts)
R23 dec1, sc26, dec1, (28 sts)
R24 dec1, sc24, dec1 (26 sts)
R25 dec1, sc22, dec1, (24 sts)
R26 dec1, sc20, dec1 (22 sts)
R27 dec1, sc18, dec1, (20 sts)
Chain one and stitch side of the hair piece made (looking at the piece, you will
continue stitching upwards, towards the magic ring made at start)
sc1 in magic ring. Ch11, slip stitch 10 to chain just made, sc1 in magic ring again,
ch11, sl st 10 to chain just made, continue with sc on the other side of the hair, sl st
last, tie off and leave long end for sewing the hair to the head later.
Pony tails can be made many ways.
We can add tassels on sides, crochet buns…you can place them on sides or upper on
the head.
Simple buns (blue haired doll)
Sc6 in magic ring
R1 inc6 (12 sts)
R2 sc12
R3 inc, sc1 x6 (18 sts)
R4-R6 sc18
R7 dec1, sc1 x6 (12 sts)
Stuff the bun well
R8 dec1, sc1 x4 (8 sts)
Tie off leaving long end for sewing the bun to the hair later.
Longer buns (orange haired doll)
Sc6 in magic ring
R1 inc1, sc1 x3 (9 sts)
R2 sc9
R3 dec1, sc1 x3 (6 sts)
Stuff the first part
R4 inc6 (12 sts)
R5-R7 sc12
R8 dec6 (6 sts)
Stuff second ball
R9 inc6 (12 sts)
R10 inc1, sc1 x6 (18 sts)
R11-R12 sc18
R13 dec1, sc1 x6 (12 sts)
R14 dec6 (6 sts)
Stuff, cut the thread leaving long end for sewing
Dress;
Ch29
Sc28
Ch2, turn, inc1, dc1…around (42 sts)
Dc42
Inc1, dc2 … around (56 sts)
Dc56
Back loops only, sc8, skip12, sc16, skip12 sc8 (32 sts)
Sc32
Ch2m turn in1, dc1…around (48 sts)
Dc48
Ch2, turn, inc1, dc2…around (64 sts)
Sl st sides and continue to work in rounds
Ch2, dc64 x5
Change color
Ch2, skip one, sl st in next, ch2, skip one, sl st in next…around
Eyes and creating dolls face
Mooshka in white dress has crocheted eyes. I made those with embroidery thread and
1,25 mm hook. You have to keep in mind that I also worked with medium weight
yarn and 2,5 hook. If you have worked with heavier yarn and bigger hook, you might
end up experimenting with the right eye size and what thread to use to make them.
To make eyes looking as similar as to Mooshka, they should not exceed the size of
5×5 stitches (on the head). Don’t feel discouraged, but give it a try with different
threads or yarns to reach the right size to make eyes.
If this you will find to complicated you can always make eyes with felt pieces or paint
them what will make them as beautiful and easier to do.
Crocheted eyes:
With black embroidery thread
Sc8 in magic ring, slip stitch last to first st in back loop of the stitch
Change color for the iris. Let it be one of bright, strong colors in blue, green or brown
Work in back loops only – Ch2, dc1 in same st where sl st made, 2dc in each of the
following 7 sts (16 sts)
Add white to sides of each eye through over 4 stitches making slip stitch, 2sc and
ending with sl st. (finish off nice and hide ends on the back side of the eye.
For the eye lashes I uses starting and ending thread from making the pupil. Instead of
hiding them I placed them on side, fixing them to stay with tiny bit of glue before
sewing them on the head.
For sewing the eyes I used so called invisible thread.
Place the eyes between rounds 15 and 19 leaving 8 stitches between them.
Once you sew them or glue them on the head take finest black marker you can find
and color the back loops of the outer eye circle. This way you will round the eyes and
make them doll looking.
You can embroider the black circle around eyes, but use fine black thread to do it.
You can embroider or paint the eyelashes and lips.
Embroider the nose in the middle of eye area, one round lower (that would be in
between rounds 19 and 20). Use two horizontal stitches for embroidering the nose.
Place the lips two rounds below the nose.
Eyebrows somewhere on the third round upper from the eyes.
Use little blush to dolls cheeks (or if you are painting the details, use pink paint for
the cheeks as well).
Hope you enjoyed making your Mooshka. Looking forward to hear from you and see
your Mooshka dolls!
For any help regarding the pattern, please feel free to contact me on